Monday 29 October 2012

A USEFUL SOFTWARE FOR FREE


Today I am going to introduce a small useful utility that called "NetSpeedMonitor"


NetSpeedMonitor is a small monitoring tool designed to be used on computers that run Windows XP, Vista, or Server 2003. It monitors a selected network interface and shows the current Up- and Downstream (bytes send and received per unit of time) in the Windows Taskbar.


-->  

In addition to the Connection Table with all TCP/UDP endpoints and the Toolbar Tooltip with a quick and short traffic overview, you can also see detailed daily and monthly Traffic Statistics. NetSpeedMonitor toolbar requires no additional drivers like other Network Monitoring tools do!


 System Requirements

  • Windows XP, Windows XP Pro x64 Edition
  • Windows Server 2003, Windows Server 2003 x64 Edition
  • Windows Vista, Windows Vista x64 Edition
  • Windows 7, Windows 7 x64 Edition
YOU CAN DOWNLOAD LATEST VERSION OF THIS SOFTWARE FROM BELOW LINK

FREE DOWNLOAD FOR 32 BIT

FREE DOWNLOAD FOR 64 BIT
✍✍✍✍✍✍✍✍✍✍✍✍✍✍✍✍✍✍✍✍

CLOSE ALL RUNNING APPLICATIONS WITH JUST A SINGLE CLICK.


CLOSE ALL RUNNING APPLICATIONS WITH JUST A SINGLE CLICK.


This free utility is a very small (36 KB) zipped download. You can close all running applications with just a single click. It doesn’t use system resources and  that requires no installation like a portable application.


Just create a shortcut to the tool in the Start Menu, Quick Launch, Windows 7 Taskbar or elsewhere.


Just follow the steps below to set it up on your computer.

1. download the zip file and extract the file on you'r hard drive


2. Now find CloseAll.exe on you'r extracted folder and right-click CloseAll.exe and choose Send To -> Desktop (create shortcut) from the context menu.


3. Switch to the Desktop and rename the created shortcut to “Close All” or whatever you want.
--> 

4. Now you can drag this shortcut to the Quick Launch Bar or to the Windows 7 Taskbar for quick access.


NOW YOU CAN CLOSE ALL RUNNING APPLICATION WITH JUST A SINGLE CLICK
&&&&&&&&&&&&............!ENJOY.........!&&&&&&&&&&&


Sunday 28 October 2012

How to save Firefox tabs when closed...!

Firefox doesn't save tabs


1. In the address line, type in "about:config" (without quotation marks). Click on "I'll be careful, I promise!"


2. In the filter field, type in browser.showQuitWarning. This should filter out all other options


3. Double click on the option that is left in the list. The value should switch from "false" to "true".


4. Close about:config tab and it should work

Learn How to connect two Computers using USB cable


There is one common misunderstanding present among newbies in computer networking. Many think like we can connect two computers directly by only using Ethernet cables and not by USB cables. They argue like USB cable is not designed to connect two computers directly. But it is old man's story and connecting two computers using USB cable is so easy as connecting two computers using Ethernet cable.

USB cable use to connect two computers


The type of USB cable which is used to connect two computers directly is called Bridged USB cable. It is available in two different USB standards. They are USB 1.1 and USB 2.0 ,

The difference of standard is based on the speed of data transfer. In USB 1.1 the data transfer speed is 12 Mbps and that in USB 2.0 is 480 Mbps. It is very important to note that no other USB cables are designed for the purpose of connecting two computers directly. Using wrong USB cables to connect two computers may harm the USB ports of your computers.


Modes of working of Bridge cable 

The bridged USB cable works in two different modes. They are

1. Link mode

2. Network Mode

In link mode two computers are connected through the bridged USB cable and the file sharing is enabled. In network mode multiple computers are connected and in addition to the file sharing the Internet too shared.


So it is very important to note that using wrong USB cables may harm your computer. So you should use Bridge USB cables to connect two computers directly.

Sunday 21 October 2012

The 101 Most Useful Websites

The 101 Most Useful Websites
The sites mentioned here, well most of them, solve at least one problem really well and they all have simple web addresses (URLs) that you can easily learn by heart thus saving you a trip to Google.

01. screen
r.com – record movies of your desktop and send them straight to YouTube.
02. ctrlq.org/screenshots – for capturing screenshots of web pages on mobile and desktops.
03. goo.gl – shorten long URLs and convert URLs into QR codes.
04. unfurlr.come – find the original URL that’s hiding behind a short URL.
05. qClock – find the local time of a city using a Google Map.
06. copypastecharacter.com – copy special characters that aren’t on your keyboard.
07. postpost.com – a better search engine for twitter.
08. lovelycharts.com – create flowcharts, network diagrams, sitemaps, etc.
09. iconfinder.com – the best place to find icons of all sizes.
10. office.com – download templates, clipart and images for your Office documents.
11. followupthen.com – the easiest way to setup email reminders.
12. jotti.org – scan any suspicious file or email attachment for viruses.
13. wolframalpha.com – gets answers directly without searching – see more wolfram tips.
14. printwhatyoulike.com – print web pages without the clutter.
15. joliprint.com – reformats news articles and blog content as a newspaper.
16. ctrql.org/rss – a search engine for RSS feeds.
17. e.ggtimer.com – a simple online timer for your daily needs.
18. coralcdn.org – if a site is down due to heavy traffic, try accessing it through coral CDN.
19. random.org – pick random numbers, flip coins, and more.
20. pdfescape.com – lets you can quickly edit PDFs in the browser itself.
21. viewer.zoho.com – Preview PDFs and Presentations directly in the browser.
22. tubemogul.com – simultaneously upload videos to YouTube and other video sites.
23. dabbleboard.com – your virtual whiteboard.
24. scr.im – share you email address online without worrying about spam.
25. spypig.com – now get read receipts for your email.
26. sizeasy.com – visualize and compare the size of any product.
27. myfonts.com/WhatTheFont – quickly determine the font name from an image.
28. google.com/webfonts – a good collection of open source fonts.
29. regex.info – find data hidden in your photographs – see more EXIF tools.
30. livestream.com – broadcast events live over the web, including your desktop screen.
31. iwantmyname.com – helps you search domains across all TLDs.
32. homestyler.com – design from scratch or re-model your home in 3d.
33. join.me – share you screen with anyone over the web.
34. onlineocr.net – recognize text from scanned PDFs – see other OCR tools.
35. flightstats.com – Track flight status at airports worldwide.
36. wetransfer.com – for sharing really big files online.
37. hundredzeros.com – best-sellers that are currently free. More ways to download free Kindle books.
38. polishmywriting.com – check your writing for spelling or grammatical errors.
39. marker.to – easily highlight the important parts of a web page for sharing.
40. typewith.me – work on the same document with multiple people.
41. whichdateworks.com – planning an event? find a date that works for all.
42. everytimezone.com – a less confusing view of the world time zones.
43. gtmetrix.com – the perfect tool for measuring your site performance online.
44. noteflight.com – print music sheets, write your own music online (review).
45. imo.im – chat with your buddies on Skype, Facebook, Google Talk, etc. from one place.
46. translate.google.com – translate web pages, PDFs and Office documents.
47. kleki.com – create paintings and sketches with a wide variety of brushes.
48. similarsites.com – discover new sites that are similar to what you like already.
49. wordle.net – quick summarize long pieces of text with tag clouds.
50. bubbl.us – create mind-maps, brainstorm ideas in the browser.
51. kuler.adobe.com – get color ideas, also extract colors from photographs.

52. liveshare.com – share your photos in an album instantly.
53. lmgtfy.com – when your friends are too lazy to use Google on their own.
54. midomi.com – when you need to find the name of a song.
55. bing.com/images – automatically find perfectly-sized wallpapers for mobiles.
56. faxzero.com – send an online fax for free – see more fax services.
57. feedmyinbox.com – get RSS feeds as an email newsletter.
58. ge.tt – quickly send a file to someone, they can even preview it before downloading.
59. pipebytes.com – transfer files of any size without uploading to a third-party server.
60. tinychat.com – setup a private chat room in micro-seconds.
61. privnote.com – create text notes that will self-destruct after being read.
62. boxoh.com – track the status of any shipment on Google Maps – alternative.
63. chipin.com – when you need to raise funds online for an event or a cause.
64. downforeveryoneorjustme.com – find if your favorite website is offline or not?
65. ewhois.com – find the other websites of a person with reverse Analytics lookup.
66. whoishostingthis.com – find the web host of any website.
67. google.com/history – found something on Google but can’t remember it now?
68. aviary.com/myna – an online audio editor that lets record, and remix audio clips online.
69. disposablewebpage.com – create a temporary web page that self-destruct.
70. urbandictionary.com – find definitions of slangs and informal words.
71. seatguru.com – consult this site before choosing a seat for your next flight.
72. sxc.hu – download stock images absolutely free.
73. zoom.it – view very high-resolution images in your browser without scrolling.
74. scribblemaps.com – create custom Google Maps easily.
75. alertful.com – quickly setup email reminders for important events.
76. picmonkey.com – Picnik is offline but PicMonkey is an even better image editor.
77. formspring.me – you can ask or answer personal questions here.
78. sumopaint.com – an excellent layer-based online image editor.
79. snopes.com – find if that email offer you received is real or just another scam.
80. typingweb.com – master touch-typing with these practice sessions.
81. mailvu.com – send video emails to anyone using your web cam.
82. timerime.com – create timelines with audio, video and images.
83. stupeflix.com – make a movie out of your images, audio and video clips.
84. safeweb.norton.com – check the trust level of any website.
85. teuxdeux.com – a beautiful to-do app that looks like your paper dairy.
86. deadurl.com – you’ll need this when your bookmarked web pages are deleted.
87. minutes.io – quickly capture effective notes during meetings.
88. youtube.com/leanback – Watch YouTube channels in TV mode.
89. youtube.com/disco – quickly create a video playlist of your favorite artist.
90. talltweets.com – Send tweets longer than 140 characters.
91. pancake.io – create a free and simple website using your Dropbox account.
92. builtwith.com – find the technology stack of any website.
93. woorank.com – research a website from the SEO perspective.
94. mixlr.com – broadcast live audio over the web.
95. radbox.me – bookmark online videos and watch them later (review).
96. tagmydoc.com – add QR codes to your documents and presentations (review).
97. notes.io – the easiest way to write short text notes in the browser.
98. ctrlq.org/html-mail – send rich-text mails to anyone, anonymously.
99. fiverr.com – hire people to do little things for $5.
100. otixo.com – easily manage your online files on Dropbox, Google Docs, etc.
101. ifttt.com – create a connection between all your online accounts.

HOW TO GET ANY WINDOWS PASSWORD

HOW TO GET ANY WINDOWS PASSWORD

ok..... here are the full details.....

this works whether its windows 2000 or windows xp or windows xp SP1 or SP2 or windows server 2003....

this works even if syskey encryption is employed...

if it is FAT filesystem...

just copy the sam file like stated in the first post to an empty floppy disk and take it home. I'll tell u what to do with it later... DON'T DELETE THE ORIGINAL SAM FILE. just remove its attributes. the sam file is a file called SAM with no extension. YOU MUST ALSO GET.... a file called SYSTEM which is in the same folder as SAM. both files have no extensions...

if it is NTFS....

u have to download a program called NTFSPro.... it allows u to read from ntfs drives... the demo version allows read only. the full version is read-write.... you use the program to create an unbootable disk (so u will still need another bootable disk and an empty disk) that has the required files to access NTFS.

use the boot disk to get into dos, then use the disks created with ntfspro to be able to access the filesystem, then copy the SAM and SYSTEM files to another empty disk to take home....

AT HOME: u have to get a program called SAMInside. it doesn't matter if it is demo version. SAMInside will open the SAM file and extract all the user account information and their passwords, including administrator. SAMInside will ask for the SYSTEM file too if the computer you took the SAM file from has syskey enabled. syskey encrypts the SAM file. SAMInside uses SYSTEM file to decrypt the SAM file. After SAMInside finishes, u still see user accounts and hashes beside them. the hashes are the encoded passwords. Use SAMInside to export the accounts and their hashes as a pwdump file into another program, called LophtCrack. it is currently in version 5, it is named LC5. the previous version, LC4 is just as good. u need the full or cracked version of the program. LC5 uses a brute force method by trying all possible combinations of letters numbers, and unprintable characters to find the correct password from the hashes in the pwdump file imported into it from SAMInside. This process of trying all passwords might take 5 minutes if the password is easy, up to a year if the password is long and hard (really really hard). LC5 howver, unlike LC4, is almost 100 times faster. both can be configured to try dictionary and common words before using all possible combinations of everything. Once the correct password is found, it will display the passwords in clear beside each account, including administrator.

I use this method so many times. I've compromised the whole school computer infrastructure. LC4 usually took between 1 second and 10 minutes to find the passwords because they were common words found in any english dictionary. I haven't used LC5 yet.

If there is anything unclear, anything I overlooked, plz tell me so that I can turn this into a very easy to follow tutorial to help anybody crack any windowz pass.

Programs needed: SAMInside (doesn't matter which version or if demo)
LC4 or LC5 (lophtcrack)( must be full version)
NTFSPro (doesn't matter if demo)
any bootdisk maker

Cracked or full version software can be found on any warez site. If u don"t know what that is or where to get the programs, post a message and I'll tell u or give them to u.

P.S: I might not keep track of this forum, because I'm going to create a new topic and post tutorial there. if u want to post, plz post there.

For Real Windows Newbie's here you go..

For Real Windows Newbie's here you go...

CTRL+C (Copy)
CTRL+X (Cut)
CTRL+V (Paste)
CTRL+Z (Undo)
DELETE (Delete)
SHIFT+DELETE (Delete the selected item permanently without placing the item in the Recycle Bin)
CTRL while dragging an item (Copy the selected item)
CTRL+SHIFT while dragging an item (Create a shortcut to the selected item)
F2 key (Rename the selected item)
CTRL+RIGHT ARROW (Move the insertion point to the beginning of the next word)
CTRL+LEFT ARROW (Move the insertion point to the beginning of the previous word)
CTRL+DOWN ARROW (Move the insertion point to the beginning of the next paragraph)
CTRL+UP ARROW (Move the insertion point to the beginning of the previous paragraph)
CTRL+SHIFT with any of the arrow keys (Highlight a block of text)
SHIFT with any of the arrow keys (Select more than one item in a window or on the desktop, or select text in a document)
CTRL+A (Select all)
F3 key (Search for a file or a folder)
ALT+ENTER (View the properties for the selected item)
ALT+F4 (Close the active item, or quit the active program)
ALT+ENTER (Display the properties of the selected object)
ALT+SPACEBAR (Open the shortcut menu for the active window)
CTRL+F4 (Close the active document in programs that enable you to have multiple documents open simultaneously)
ALT+TAB (Switch between the open items)
ALT+ESC (Cycle through items in the order that they had been opened)
F6 key (Cycle through the screen elements in a window or on the desktop)
F4 key (Display the Address bar list in My Computer or Windows Explorer)
SHIFT+F10 (Display the shortcut menu for the selected item)
ALT+SPACEBAR (Display the System menu for the active window)
CTRL+ESC (Display the Start menu)
ALT+Underlined letter in a menu name (Display the corresponding menu)
Underlined letter in a command name on an open menu (Perform the corresponding command)
F10 key (Activate the menu bar in the active program)
RIGHT ARROW (Open the next menu to the right, or open a submenu)
LEFT ARROW (Open the next menu to the left, or close a submenu)
F5 key (Update the active window)
BACKSPACE (View the folder one level up in My Computer or Windows Explorer)
ESC (Cancel the current task)
SHIFT when you insert a CD-ROM into the CD-ROM drive (Prevent the CD-ROM from automatically playing)
Dialog Box Keyboard Shortcuts
CTRL+TAB (Move forward through the tabs)
CTRL+SHIFT+TAB (Move backward through the tabs)
TAB (Move forward through the options)
SHIFT+TAB (Move backward through the options)
ALT+Underlined letter (Perform the corresponding command or select the corresponding option)
ENTER (Perform the command for the active option or button)
SPACEBAR (Select or clear the check box if the active option is a check box)
Arrow keys (Select a button if the active option is a group of option buttons)
F1 key (Display Help)
F4 key (Display the items in the active list)
BACKSPACE (Open a folder one level up if a folder is selected in the Save As or Open dialog box)
Microsoft Natural Keyboard Shortcuts
Windows Logo (Display or hide the Start menu)
Windows Logo+BREAK (Display the System Properties dialog box)
Windows Logo+D (Display the desktop)
Windows Logo+M (Minimize all of the windows)
Windows Logo+SHIFT+M (Restore the minimized windows)
Windows Logo+E (Open My Computer)
Windows Logo+F (Search for a file or a folder)
CTRL+Windows Logo+F (Search for computers)
Windows Logo+F1 (Display Windows Help)
Windows Logo+ L (Lock the keyboard)
Windows Logo+R (Open the Run dialog box)
Windows Logo+U (Open Utility Manager)
Accessibility Keyboard Shortcuts
Right SHIFT for eight seconds (Switch FilterKeys either on or off)
Left ALT+left SHIFT+PRINT SCREEN (Switch High Contrast either on or off)
Left ALT+left SHIFT+NUM LOCK (Switch the MouseKeys either on or off)
SHIFT five times (Switch the StickyKeys either on or off)
NUM LOCK for five seconds (Switch the ToggleKeys either on or off)
Windows Logo +U (Open Utility Manager)
Windows Explorer Keyboard Shortcuts
END (Display the bottom of the active window)
HOME (Display the top of the active window)
NUM LOCK+Asterisk sign (*) (Display all of the subfolders that are under the selected folder)
NUM LOCK+Plus sign (+) (Display the contents of the selected folder)
NUM LOCK+Minus sign (-) (Collapse the selected folder)
LEFT ARROW (Collapse the current selection if it is expanded, or select the parent folder)
RIGHT ARROW (Display the current selection if it is collapsed, or select the first subfolder)
Shortcut Keys for Character Map
After you double-click a character on the grid of characters, you can move through the grid by using the keyboard shortcuts:
RIGHT ARROW (Move to the right or to the beginning of the next line)
LEFT ARROW (Move to the left or to the end of the previous line)
UP ARROW (Move up one row)
DOWN ARROW (Move down one row)
PAGE UP (Move up one screen at a time)
PAGE DOWN (Move down one screen at a time)
HOME (Move to the beginning of the line)
END (Move to the end of the line)
CTRL+HOME (Move to the first character)
CTRL+END (Move to the last character)
SPACEBAR (Switch between Enlarged and Normal mode when a character is selected)
Microsoft Management Console (MMC) Main Window Keyboard Shortcuts
CTRL+O (Open a saved console)
CTRL+N (Open a new console)
CTRL+S (Save the open console)
CTRL+M (Add or remove a console item)
CTRL+W (Open a new window)
F5 key (Update the content of all console windows)
ALT+SPACEBAR (Display the MMC window menu)
ALT+F4 (Close the console)
ALT+A (Display the Action menu)
ALT+V (Display the View menu)
ALT+F (Display the File menu)
ALT+O (Display the Favorites menu)
MMC Console Window Keyboard Shortcuts
CTRL+P (Print the current page or active pane)
ALT+Minus sign (-) (Display the window menu for the active console window)
SHIFT+F10 (Display the Action shortcut menu for the selected item)
F1 key (Open the Help topic, if any, for the selected item)
F5 key (Update the content of all console windows)
CTRL+F10 (Maximize the active console window)
CTRL+F5 (Restore the active console window)
ALT+ENTER (Display the Properties dialog box, if any, for the selected item)
F2 key (Rename the selected item)
CTRL+F4 (Close the active console window. When a console has only one console window, this shortcut closes the console)
Remote Desktop Connection Navigation
CTRL+ALT+END (Open the Microsoft Windows NT Security dialog box)
ALT+PAGE UP (Switch between programs from left to right)
ALT+PAGE DOWN (Switch between programs from right to left)
ALT+INSERT (Cycle through the programs in most recently used order)
ALT+HOME (Display the Start menu)
CTRL+ALT+BREAK (Switch the client computer between a window and a full screen)
ALT+DELETE (Display the Windows menu)
CTRL+ALT+Minus sign (-) (Place a snapshot of the active window in the client on the Terminal server clipboard and provide the same functionality as pressing PRINT SCREEN on a local computer.)
CTRL+ALT+Plus sign (+) (Place a snapshot of the entire client window area on the Terminal server clipboard and provide the same functionality as pressing ALT+PRINT SCREEN on a local computer.)
Microsoft Internet Explorer Navigation
CTRL+B (Open the Organize Favorites dialog box)
CTRL+E (Open the Search bar)
CTRL+F (Start the Find utility)
CTRL+H (Open the History bar)
CTRL+I (Open the Favorites bar)
CTRL+L (Open the Open dialog box)
CTRL+N (Start another instance of the browser with the same Web address)
CTRL+O (Open the Open dialog box, the same as CTRL+L)
CTRL+P (Open the Print dialog box)
CTRL+R (Update the current Web page)
CTRL+W (Close the current window)

Thursday 18 October 2012

Speed up Google Chrome:Hidden Tips

Speed up Google Chrome:Hidden Tips

Image Source
Recently, in 2012, Google Chrome has become the most popular browser for its flexibility, stability and simplicity. There is no doubt that it is faster and an advanced browser with advanced features designed for all. Though sometimes it becomes slower comparing your requirements, PC hardware and imagination. For these reasons Google chrome will let you modify and make the browser more suitable in your working environment.

Here the time saving tips with some hidden tricks to increase the browsing, download and start-up speed of Chrome browser.

Note: All these tips are same for Google Chrome 19 or above versions.


1. Set high priority to Google Chrome process.
Windows OS shares the processor time between all running processes based upon their priority. Setting the higher priority to a process means that the process is more important to the operating system compared other low priority processes. This will gear-up the start up time and browsing speed of the browser. To set a high priority to Google Chrome, open the Windows Task Manager by pressing "Ctrl+Shift+Esc" together. Then run the Browser and from Task Manager Find out the chrome.exe. Right click on it and set the priority higher.
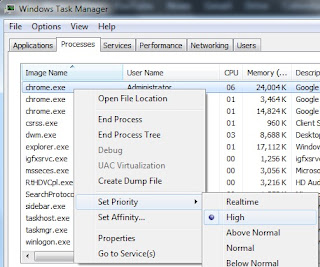
High Priority to Chrome.exe

2. Disable Google Chrome automatic updates.
This will stop the Google chrome update process "GoogleUpdater.exe" and let the browser work more lightly every time. It helps the browser start-up more quickly. It also save some CPU and RAM usages. We have discussed it here and showed how to disable it.

3. Enabling GPU acceleration and composting.
Now-a-days web pages are more and more graphically designed for the users. So the web browsers are implementing hardware acceleration technology for GPU. This will help the browser to accelerate the GPU (graphics processing unit) signals on pages. Go to browser address bar in Google Chrome and type "chrome://flags" and hit Enter. Enable both GPU composting on all pages and GPU accelerated SVG and CSS filters.
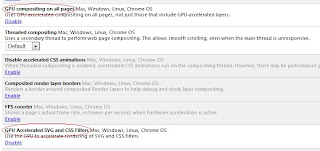
GPU acceleration and composting settings

4. Configuring Settings.
This part will show only those settings whose are important for the browser to get some extra speed. It is also a useful idea for slow internet connection.
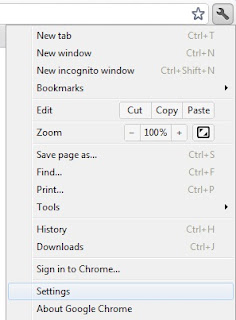
Go to the wrench icon top-right corner and click on Settings. Expand the Show advanced settings from the bottom of this page.
Google Chrome Settings

     a. Sign in. Connect it if you really need to sync your bookmarks, extensions, themes etc. Otherwise remain it disconnected.
Sign in option to sync data

     b. Appearances. Un-tick on both Show home button and Always show bookmark.
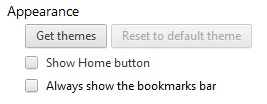
Appearances Settings

     c. Privacy. Un-tick on Use a web service to help resolve navigation errors and Automatically send usage statistics and crash reports to Google.
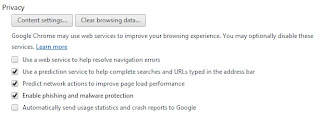
Privacy settings

     d. Languages. Un-mark the offer to translate only if you don't use to read content in other languages without English.
Offer to Translate Languages


     e. HTTPS/SSL. No need to choose Check for server certificate revocation. Because certificate revocation is not needed normally.
HTPPS/SSL

5. Disable Developer mode.
If you aren't a developer then disable this mode by going wrench icon > Tools > Extensions > un-tick Developer mode.
Developer Mode


6. Clear Browsing Data. There is nothing new to say that your browsing data will slow down the browser. So better is to practice clearing browsing data regularly. This option is available in wrench > Settings.
Clear all browsing data

From now you will notice that your Google Chrome browser is more speedy than before. 
Please note that some tips may not be same in future as the Google Chrome is realizing updates frequently and making changes to different options.

How to Change folder background in Windows 7/vista/xp[without software]

How to Change folder background in Windows 7/vista/xp[without software]

We like to customize folder and drive’s icon, color, view to give it a unique look. What about changing folder background?
set background image
Folder Background
Usually we use software to do that. But here we’ll change the folder’s background without any software. To do so firstly we should know, what is the “desktop.ini” and how it worksDesktop.ini is the file where system assigns the values of icon, info, background image source etc. The folder will gives info about itself or a thumbnail view which has the proper desktop.ini file. It is a hidden system file and it's possible to show by CASE: 2 step: 2 in this article. Nothing to worry about it because the system can automatically create a new one if the file is being damaged or absent. It just needs a reboot of the system.
Don’t like to read? Watch this video to change folder background.


Didn’t get a clear idea? Read the tutorial. 
The following tutorial will show how to set an image as the background in a folder. This tutorial is divided into two CASEs according two different conditions.
CASE 1: Creating a desktop.ini file
  1. Go to the folder which background image will be changed.
  2. Create a new text file and open to edit it.
  3. Copy following two lines and paste them to the text file.
    [AveFolder]
    IconArea_Image="C:\Users\user_name\my pictures\image.jpg"
  4. If you want a shadow effect for text give ShadowedText=1 and for applying same image to all sub directories give Recursive=1 like this.
    [AveFolder]
    IconArea_Image="C:\Users\user_name\my pictures\image.jpg"
    ShadowedText=1
    Recursive=1
    Untitled
    ShadowText & Recursive
  5. After creating, save the text file then rename it to desktop.ini
  6. Restart your PC.
The “IconArea_Image=” (CASE: 1 step 3) describes the source path of the background-Image. You should not select an image source path from removal disk. If you are setting up the image of your removal drive then your background-image source should describe a path of that drive.
Sometimes a message could come showing replacement of desktop.ini file. That means your working folder already has same file. It is better to cancel the replacement of this file and follow the CASE: 2.
CASE 2: Editing desktop.ini
  1. Go to Folder Option from Control panel or from explorer’s menu bar>folder option.
    Untitled03Untitled02
  2. Select view tab and scroll down to find out hide protected operating system file and uncheck it. It is important to mark Show hidden files, folders and drives first from thisview tab.
    Untitled04
    Folder Option>View tab

  3. Find out the desktop.ini in the current directory and open it with a text editor, like: notepad.
    Untitled05
    Hidden desktop.ini

  4. Paste the lines described in CASE: 1 step: 3, just after the [.ShellClassInfo]’s description lines.
    Untitled01
    [.ShellClassInfo] & [AveFolder]

  5. Save and exit from desktop.ini
  6. Restart your PC.
Important: The background image won’t change properly until restart your computer.

Split a Drive into 2 or More Partitions in Windows [without extra software]

Split a Drive into 2 or More Partitions in Windows [without extra software]

Splitting a hard disk drive into two or more partitions refers to slice/divide/partition a particular drive into multiple logical drives. Usually manufacturer of a laptop or desktop computer gives one partition and it's the system drive C: where you have to keep your all documents, pictures, music and other files. It often creates problems to manage all types of data in a same partition. Moreover, there is a risk to keep the important files in a partition which is the system drive. Because when the operating system like Windows fails to boot or start up and it is unable to fixitself from it's repair mode then recovery or external boot most of the times unable to recover your personal files from the drive.


So dividing the drive is an important topic if you want to keep the different types of files in other than the system drive and get them back even after re-installing Windows OS. Adding that, you may need a separate  drive for backup/recovery or want to install another operating system (known as dual boot) to another drive. 


The simple way to partition a dive:
Windows 8/7/Vista Users don't need to download extra tools or waste money doing this task as they already have a Disk Management built-in. 


     1. First step is to go to  Manage by right-clicking on Computer. Or open the Control Panel and navigate to the System and Security, Administrative Tools, Computer Management (it's in the category view of Control Panel).
Computer > Manage
Manage from Computer


     2. From the left Pane click on Disk Management under the Storage and your disks will be loaded within a moment.
Storage > Disk Management
Disk Management


     3. Now select the drive you want to split and select the Shrink the volume. The selected drive should have some free space and that free space will be the new volume.


     4. In the new Shrink window size of the new volume is already given. Be careful! It just displays the free space. You should/must decrease the given size so that the existing drive can get some free space. Set the amount of space in megabytes.
set  the size to shrink
Shrink a Volume/Drive


     5. Shrink it. It could take a while.
Shrink done & Unlocated volume created
It's not done yet! A new Unllocated Space will be shown which has no drive letter and Windows will unable to display or work with it. It needs to be assigned as a Logical Drive. So, right-click on the Unllocated Drive and select New Simple Volume.


     6. The New Simple Volume Wizard will drive to make the drive Logical. Click on Next and then the amount of the volume will be set automatically. You can wish to decrease the size if you want to create another volume.
Set drive size


     7. Here, assign the drive letter and continue Next.
Assign drive letter
Assign drive letter


     8. Now Format the Partition in NTFS file system and mark the Quick format. You can also set a name to the drive in Volume label.
New Simple Volume Wizard
Set File system, label & mark quick format


     9. Completing the new Simple Volume Wizard shows the settings that are made for this new partition. Here click on the Finish and within a minute the new drive will be created.
New primary drive
New drive created
   
You are done! Now you can use the separate drive for storing and installing files and software even for a dual boot.