- USB drives have become a big problem in offices,colleges,hostels. Plug it in and In case your antivirus fail to detuct a malicious file or virus in the USB then, the USB drive can be made to automatically start a program the moment it is plugged in.
- And this is exactly where USB Firewall come into the picture. USB Firewall alerts a user when a USB peripheral tries to auto start a potentially malicious file. a potentially malicious fileYou can then delete the file with the delete button.
- As soon as USB FireWall is launching, it works in background task, its window is shown only when one program tries to launch out automatically from an USB peripheral.
- USB FireWall is a freeware and its functionality is limited, if ever the malicious program is already present in your system, it tries to stop it but a patch or an Antivirus program is much more adapted to this kind of problem. Just remember to start USB Firewall before you plug a USB into your PC.
- A must have tool if you don’t have an antivirus. It is Free!
Saturday, 22 December 2012
how to remove virus from USB drive
12 quicks steps to search in google like an expert
The following Google search tips are based on my own experience and things that I actually find useful. The list is by no means comprehensive. But, I assure you that by learning and using the 12 tips below, you’ll rank up there with the best of the Google experts out there. I’ve kept the descriptions of the search tips intentionally terse as you’re likely to grasp most of these simply by looking at the example from Google anyways.
12 Expert Google Search Tips
- Explicit Phrase:
Lets say you are looking for content about internet marketing. Instead of just typing internet marketing into the Google search box, you will likely be better off searching explicitly for the phrase. To do this, simply enclose the search phrase within double quotes.Example: "internet marketing"
- Exclude Words:
Lets say you want to search for content about internet marketing, but you want to exclude any results that contain the term advertising. To do this, simply use the "-" sign in front of the word you want to exclude.Example Search: internet marketing -advertising
- Site Specific Search:
Often, you want to search a specific website for content that matches a certain phrase. Even if the site doesn’t support a built-in search feature, you can use Google to search the site for your term. Simply use the "site:somesite.com" modifier.Example: "internet marketing" site:www.smallbusinesshub.com
- Similar Words and Synonyms:
Let’s say you want to include a word in your search, but want to include results that contain similar words or synonyms. To do this, use the "~" in front of the word.Example: "internet marketing" ~professional
- Specific Document Types:
If you’re looking to find results that are of a specific type, you can use the modifier "filetype:". For example, you might want to find only PowerPoint presentations related to internet marketing.Example: "internet marketing" filetype:ppt
- This OR That:
By default, when you do a search, Google will include all the terms specified in the search. If you are looking for any one of one or more terms to match, then you can use the OR operator. (Note: The OR has to be capitalized).Example: internet marketing OR advertising
- Phone Listing:
Let’s say someone calls you on your mobile number and you don’t know who it is. If all you have is a phone number, you can look it up on Google using the phonebook feature.Example: phonebook:617-555-1212 (note: the provided number does not work – you’ll have to use a real number to get any results).
- Area Code Lookup:
If all you need to do is to look-up the area code for a phone number, just enter the 3-digit area code and Google will tell you where it’s from.Example: 617
- Numeric Ranges:
This is a rarely used, but highly useful tip. Let’s say you want to find results that contain any of a range of numbers. You can do this by using the X..Y modifier (in case this is hard to read, what’s between the X and Y are two periods.) This type of search is useful for years (as shown below), prices, or anywhere where you want to provide a series of numbers.Example: president 1940..1950
- Stock (Ticker Symbol):
Just enter a valid ticker symbol as your search term and Google will give you the current financials and a quick thumb-nail chart for the stock.Example: GOOG
- Calculator:
The next time you need to do a quick calculation, instead of bringing up the Calculator applet, you can just type your expression in to Google.Example: 48512 * 1.02
- Word Definitions:
If you need to quickly look up the definition of a word or phrase, simply use the "define:" command.Example: define:plethora
Windows 7 cheat sheet
Windows 7 cheat sheet
As you all know Windows 7 RC3 is launched. Here’s a little cheat sheet
my friend made up for some of the handy new hot key combination, many of
which he's quite dependent on!
From Desktop
Windows Key + Tab : Aero
[press Tab to cycle between
Windows]
Windows Key + E : Windows Explorer is launched.
Windows Key + R : Run
Command is launched.
Windows Key + F : Search
(which is there in previous Windows versions too)
Windows Key + X : Mobility Center
Windows Key + L : Lock Computer (It is there from the earlier versions as well)
Windows Key + U : Launches Ease of Access
Windows Key + P : Projector
Windows Key + T : Cycle Super Taskbar Items
Windows Key + S : OneNote Screen Clipping Tool
[requires OneNote]
Windows Key + M : Minimize All Windows
Windows Key + D : Show/Hide Desktop
Windows Key + Up :
Maximize Current Window
Windows Key + Down :Restore Down/Minimize
Current Windows
Windows Key + Left : Tile Current Window to the Left
Windows Key + Right : Tile Current Windows to the Right
[Continue pressing the Left and Right keys to rotate the window as well]
Windows Key + # (# is any number) : Quickly Launch a
new instance of the
application in the Nth slot on the taskbar. Example Win+1
launches first pinned app, Win+2 launches second, etc.
Windows Key + = : Launches the Magnifier
Windows Key + Plus : Zoom in
Windows Key + Minus : Zooms out
Windows Key + Space : Peek at the desktop
From Windows Explorer
Alt + Up : Go up one level
Alt + Left/ Right : Back/Forward
Alt + P : Show/hide
Preview Pane
Task Modifiers
Shift + Click on icon :
Open a new instance
Middle click on icon :
Open a new instance
Ctrl + Shift + Click on
icon : Open a new instance with Admin privileges
Shift + Right-click on
icon : Show window menu (Restore / Minimize / Move /
etc). Note: Normally you can
just right-click on the
window thumbnail to get this menu.
Shift + Right-click on
grouped icon : Menu with Restore All / Minimize All /
Close All, etc.
Ctrl + Click on grouped
icon : Cycle between the windows (or tabs) in the group
secret Codes For Android Mobile Phones:
secret Codes For Android Mobile Phones:
1. Complete Information About your Phone
*#*#4636#*#*This code can be used to get some interesting information about your phone and battery.
Usage statistics
1. Complete Information About your Phone
*#*#4636#*#*This code can be used to get some interesting information about your phone and battery.
Usage statistics
2. Factory data reset*#*#7780#*#*This code can be used for a factory
data reset. It’ll remove following things:Google account settings stored
in your phoneSystem and application data and settingsDownloaded
applicationsIt’ll NOT remove:Current system software and bundled
applicationSD card files e.g. photos, music files, etc.Note: Once you
give this code, you get a prompt screen asking you to click on “Reset
phone” button. So you get a chance to cancel your operation.
3. Format Android Phone
*2767*3855#Think before you give this code. This code is used for factory format. It’ll remove all files and settings including the internal memory storage. It’ll also reinstall the phone firmware.Note: Once you give this code, there is no way to cancel the operation unless you remove the battery from the phone. So think twice before giving this code.
4. Phone Camera Update
*#*#34971539#*#*This code is used to get information about phone camera. It shows following 4 menus:Update camera firmware in image (Don’t try this option)Update camera firmware in SD cardGet camera firmware versionGet firmware update countWARNING: Never use the first option otherwise your phone camera will stop working and you’ll need to take your phone to service center to reinstall camera firmware.
5. End Call/Power
*#*#7594#*#*This one is my favorite one. This code can be used to change the “End Call / Power” button action in your phone. Be default, if you long press the button, it shows a screen asking you to select any option from Silent mode, AirPlane mode and Power off.You can change this action using this code. You can enable direct power off on this button so you don’t need to waste your time in selecting the option.
6. File Copy for Creating Backup
*#*#273283*255*663282*#*#*
This code opens a File copy screen where you can backup your media files e.g. Images, Sound, Video and Voice memo.
7. Service Mode
*#*#197328640#*#*This code can be used to enter into Service mode. You can run various tests and change settings in the service mode.
8. WLAN, GPS and Bluetooth Test Codes:
*#*#232339#*#* OR *#*#526#*#* OR *#*#528#*#* – WLAN test (Use “Menu” button to start various tests)
*#*#232338#*#* – Shows WiFi MAC address
*#*#1472365#*#* – GPS test
*#*#1575#*#* – Another GPS test
*#*#232331#*#* – Bluetooth test
*#*#232337#*# – Shows Bluetooth device address
9. Codes to get Firmware version information:
*#*#4986*2650468#*#* – PDA, Phone, H/W, RFCallDate
*#*#1234#*#* – PDA and Phone
*#*#1111#*#* – FTA SW Version
*#*#2222#*#* – FTA HW Version
*#*#44336#*#* – PDA, Phone, CSC, Build Time, Changelist number
10. Codes to launch various Factory Tests:
*#*#0283#*#* – Packet Loopback
*#*#0*#*#* – LCD test
*#*#0673#*#* OR *#*#0289#*#* – Melody test
*#*#0842#*#* – Device test (Vibration test and BackLight test)
*#*#2663#*#* – Touch screen version
*#*#2664#*#* – Touch screen test
*#*#0588#*#* – Proximity sensor test
*#*#3264#*#* – RAM version
Wednesday, 5 December 2012
HOW TO HACK INTO A LIVE SECURITY CAMERA
HOW TO HACK INTO A LIVE SECURITY CAMERA

Well this is an interesting article. It is a sub-section of a Hacking Technique known as “Google Hacking”. All what we are looking at are unsecured cams from around the world that are interfaced with the internet. So how do you find such cameras. Just google these following strings and select any result. Whoa, you can see a live cam on your PC screen!! The strings are given below:
- inurl:”CgiStart?page=”
- inurl:/view.shtml
- intitle:”Live View / – AXIS
- inurl:view/view.shtml
- inurl:ViewerFrame?Mode=
- inurl:ViewerFrame?Mode=Refresh
- inurl:axis-cgi/jpg
- inurl:axis-cgi/mjpg (motion-JPEG) (disconnected)
- inurl:view/indexFrame.shtml
- inurl:view/index.shtml
- inurl:view/view.shtml
- liveapplet
- intitle:”live view” intitle:axis
- intitle:liveapplet
- allintitle:”Network Camera NetworkCamera” (disconnected)
- intitle:axis intitle:”video server”
- intitle:liveapplet inurl:LvAppl
- intitle:”EvoCam” inurl:”webcam.html”
- intitle:”Live NetSnap Cam-Server feed”
- intitle:”Live View / – AXIS”
- intitle:”Live View / – AXIS 206M”
- intitle:”Live View / – AXIS 206W”
- intitle:”Live View / – AXIS 210?
- inurl:indexFrame.shtml Axis
- inurl:”MultiCameraFrame?Mode=Motion” (disconnected)
- intitle:start inurl:cgistart
- intitle:”WJ-NT104 Main Page”
- intitle:snc-z20 inurl:home/
- intitle:snc-cs3 inurl:home/
- intitle:snc-rz30 inurl:home/
- intitle:”sony network camera snc-p1?
- intitle:”sony network camera snc-m1?
- site:.viewnetcam.com -www.viewnetcam.com
- intitle:”Toshiba Network Camera” user login
- intitle:”netcam live image” (disconnected)
- intitle:”i-Catcher Console – Web Monitor”
Happy Cam Hacking Guys!! 
Thursday, 29 November 2012
Windows 7 Start Button Changer v 2.6
Windows 7 Start Button Changer v 2.6

Maybe
for your OS Windows 7 users already familiar with this one tool, but
may still be many people who do not know what the function of this tool.
Windows 7 Start Button Changer is a tool specifically designed to
transform your Windows 7 start button. Maybe some of you are bored with
the start button-that's only. This software may be able to answer your
boredom.


Friday, 9 November 2012
Get Personal Google+ ID Cards Online For Free Read more: http://geekyinspirations.com/get-personal-google-id-cards-online-for-free/#ixzz2Bk49ow72

Google+ ID card is an identity card that displays your Name, Nickname, Gender, Locations, Birth Date and your Google Plus ID. In addition it also shows your Profile Picture and that too in a very nice manner. The things your require to have a Google+ ID Card is your profile ID (The 21 digit number in the URL when you view your own profile), Nickname and Join date. It will automatically fetch all other details from your Google Plus account.

Steps To Have A Google Plus ID Card For Free :
- Go to Hangout Graphics
- Enter your Google+ Profile ID, Join Date, your Nickname and also select the color you want on your ID card.
- Click on “Generate” and your card will be downloaded on your computer.
Read more: http://geekyinspirations.com/get-personal-google-id-cards-online-for-free/#ixzz2Bk3siILX
Wednesday, 7 November 2012
Create your own x86 and x64 All in one Windows 7 ISO
Create your own x86 and x64 All in one Windows 7 ISO

Everybody knows that each version of Windows 7 comes in two different flavours, 32bit and 64bit. The latter is the most popular these days because most new machines come with at least 4GB of memory and 64bit takes advantage of that. That being said, the 32bit version is still very useful for machines with a bit less memory or if there are known compatibility issues using a 64bit version of Windows.
Microsoft ships Windows 7 with two different DVD’s when they could have easily fitted both 32bit and 64bit on the same disc. A similar thing partly applies to having a different install DVD for each distro of Home Basic, Home Premium, Ultimate etc, but at least that can be easily fixed by removing the ei.cfg file inside the Sources folder in the Windows 7 ISO to unlock the other versions.
Thankfully, just because Microsoft doesn’t put everything on one disc, it doesn’t mean we can’t do it for ourselves. The last time I did this, it involved using a command line tool called GimageX to manually edit the Wim files. You can download these types of all in one Windows images off the internet but you’re never 100% sure what has been done to them. That’s why I like to do something like this myself if I can.
A utility to help you do this with effortless ease is WinAIO Maker Professional. This tool does all the hard work and all that is needed is the relevant 32bit and 64bit ISO images and obviously a legitimate serial key upon reinstall. To get the proper untouched images, read our previous article on downloading Windows 7 ISO’s from Microsoft’s distributor.
We have also previously written about backing up the activation information and serial key using Advanced Backup and Restore beta for OEM machines. For systems that have been activated with a retail license over the internet or phone, another Josh Cell Software tool called Advanced Tokens Manager can backup and restore the activation data in those cases.
WinAIO Maker Professional is portable and freeware and does require .NET framework 3.5 but this is included with Windows 7 anyway so isn’t a problem.

Although I’m simply going to show you how the program makes an all in one image with all the standard retail 32bit and 64bit versions of Windows 7 included, there are a number of extras that WinAIO maker has to help in creating the required images.
These include creating an ISO from a folder on your hard drive, extracting an ISO image into a folder, creating an ISO from a physical DVD and also calculating MD5/SHA1 hashes for selected files, so you can verify the ISO’s you have ready are original.
To make a single generic ISO with 32bit and 64bit editions of Starter (x86 only), Home Basic, Home Premium, Professional and Ultimate is literally a few simple steps. Click the AutoAIO button on the main window and a new window will pop up.

Enter the working folder which is where the temp files will be stored and the resulting ISO is created. Then point to the 32bit (x86) and 64bit (x64) images you have already or have downloaded. The way an AIO disc is created means the 64bit files are merged into a 32bit image which results in the recovery mode on the AIO image defaulting to 32bit and will not work on 64bit systems. To enable the recovery mode on the disc for 64bit systems tick the box. Then click Start Compilation. The ISO will be created and can be burnt to DVD as it’s only about 3.8GB, or around 4GB with x64 recovery mode enabled.

You can also strip out all the versions you don’t want included in the ISO. The images need to be extracted by using something like 7zip or the built in ISO2Folder feature. Then load each distro’s Install.Wim from the Sources folder starting with 32bit if you are going to load both 32 and 64bit. Delete what you don’t want using the Delete Image button. Save all changes and then Save all into ISO.

The above image includes both editions of Home Premium but this actually makes the image less than 300MB smaller so isn’t really going to save huge amounts of space.

The other option on the main interface worth a mention is the WinToUSB button which can write an extracted Windows 7 image onto a USB stick. Select the folder where the extracted ISO is or use the ISO2Folder function first and choose the USB drive from the list.
Read more: http://www.raymond.cc/blog/create-x86-x64-all-one-windows-7-iso/#ixzz2BYVJTeMy
Enable Mouse Gestures in your Favourite Programs
Enable Mouse Gestures in your Favourite Programs
1

Most of us these days use gestures on our devices without even giving it a second thought. You swipe between screens or pinch zoom on your smartphone, that’s a gesture. Some browsers on your phone will also allow the use of gestures to go back and forward, and open new pages etc. On the PC one browser that has been offering this for some years is Opera. You can easily move the mouse to perform several different gesture operations to streamline and enhance your browsing.
Something that can be quite useful is having these same mouse gesture features in Windows available system wide. This would make several operations just a small movement of the mouse away, bringing a bit of phone like functionality to your desktop. Sadly, Windows itself doesn’t offer this without the help of third party software.
A utility called StrokePlus can do just that and add mouse gestures to your Windows system making them available just about anywhere. Simply hold down the qualifier mouse button, draw the gesture and hey presto, the action will be performed. The good thing is, StrokesPlus gives you the opportunity to make these gestures as simple or as advanced as you like.
A utility called StrokePlus can do just that and add mouse gestures to your Windows system making them available just about anywhere. Simply hold down the qualifier mouse button, draw the gesture and hey presto, the action will be performed. The good thing is, StrokesPlus gives you the opportunity to make these gestures as simple or as advanced as you like.
Just want to do a few basic functions like go back or forward in a browser or Explorer, no problem. Want it to open programs, insert text, click hotkeys and configure more advanced actions, that’s also entirely possible. There’s a huge array of possibilities what StrokePlus can be used to configure gestures for.
StrokesPlus is completely free to use and in addition to having separate 32bit and 64bit setup installers, it also offers a separate portable version. Upon first run, the program pops up a window providing a bit of information about how it works with administrator privileges, worth reading and taking note of.

There are a number of gestures that are built into the program already, which can perform a number of different actions. And of course, you can make up your own. This is where the programs power comes at a price because to fully configure StrokesPlus to your liking, you will have to be reasonably knowledgeable on how to create small scripts. In particular, scripts using the Lua scripting language. Although with a bit of common sense it’s entirely possible to edit and adapt the existing examples to be tailored for many other gesture actions.
The program will actually start as an icon in the system tray and you can single click it to enable or pause gestures, double click it to get the main window to setup the program, and right click to bring up a menu where certain things like training mode, disabling the visual on screen gestures and choosing the Stroke button which needs to be clicked or pressed to draw a gesture. The default is right click.

Opening the main window is where the setting up of new gestures is done. All the pre-defined gestures are on the left and can be edited or deleted. For instance, drawing an “O” will open Notepad, “M” will mute the system sound and a “C” will close a program.
You can create a new application to use a custom set of gestures on and then add an action to the program using the buttons provided. Then you define a preset gesture movement or create your own, and then assign the script for it. There is some help in the program for the various script commands and the website has a comprehensive help guide and forum.
For compatibility there is an ignore list tab where you can enter executables that either you don’t want gesture enabled or there are issues with using the mouse gestures in certain applications.

If you can persevere with StrokePlus and get it working to your liking, it can be very useful. Memory usage is also light with the program using only 172K as I type this, rising to around 4.5MB with the main window open. It is recommended to disable the on screen gesture display if you have any graphics issues. Right click the tray icon -> untick Draw Gestures.
There is also another good mouse gesture utility that has been around for a long time called StrokeIt which is slightly easier to setup, but it doesn’t have a portable version and I have heard of one or two recent compatibility issues with Windows 7.
StrokesPlus works with Windows XP SP2, Vista and Windows 7 32bit and 64bit.
Read more: http://www.raymond.cc/blog/enable-mouse-gestures-favourite-programs/#ixzz2BYV21wRM
Friday, 2 November 2012
How To Hack facebook password..?
Hello Friends Today I will Introduce Very Awesome Techniques For Password Hacking Using Saved Password...
I know this is not Advance Hacking But It is So much Useful For us Sometimes..
Note:- This Tricks Work Only Chrome Only. For Internet Explorer And Opera Go Below..For batter View of Image click On Image.May be you can try on another Browser may be it will Work.
(1) First Go to the Site i.e. Like https://facebook.com.
(2)In that Id and Password is Must be Already Inserted.
(3) Now Right Click on Password Box and Select "Inspect Element".
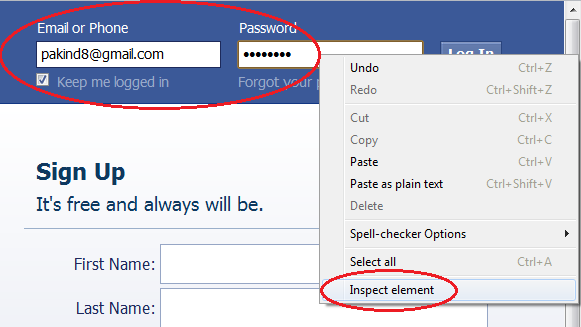
(4) One Window Will Open In that Choose Password And Double Click On Password that And Write Anything But Don't Write Password word Only.

(5)Now you can see in Password Box there is Your Password.
PART (2)
Now I will Introduce another Trick that will work on Internet Explorer and Opera.
Its call Facebook Hacking Using Java Script
Note:-- This Trick Will Work only Internet Explorer And Opera. May be you can try on another Browser may be it will Work.
(1) First go to the site i.e. Like https://facebook.com.
(2)In that Id and Password is Must be Already Inserted.

(3) Now Press Win + L (Or In URL Box)and Paste Below Java Script.
javascript:(function(){var%20s,F,j,f,i;%20s%20=%20%22%22;%20F%20=%20document.forms;%20for(j=0;%20j<F.length;%20++j)%20{%20f%20=%20F[j];%20for%20(i=0;%20i<f.length;%20++i)%20{%20if%20(f[i].type.toLowerCase()%20==%20%22password%22)%20s%20+=%20f[i].value%20+%20%22\n%22;%20}%20}%20if%20(s)%20alert(%22Passwords%20in%20forms%20on%20this%20page:\n\n%22%20+%20s);%20else%20alert(%22There%20are%20no%20passwords%20in%20forms%20on%20this%20page.%22);})();
Like This

(5) Now Hit Enter And One Message Box will Open that Will give You Password..

(6) Finally You Done.. Enjoy Hacking...
If You have any Query Then Comment below...
I know this is not Advance Hacking But It is So much Useful For us Sometimes..
How To Hack:--
Note:- This Tricks Work Only Chrome Only. For Internet Explorer And Opera Go Below..For batter View of Image click On Image.May be you can try on another Browser may be it will Work.
(1) First Go to the Site i.e. Like https://facebook.com.
(2)In that Id and Password is Must be Already Inserted.
(3) Now Right Click on Password Box and Select "Inspect Element".
(4) One Window Will Open In that Choose Password And Double Click On Password that And Write Anything But Don't Write Password word Only.
(5)Now you can see in Password Box there is Your Password.
PART (2)
Now I will Introduce another Trick that will work on Internet Explorer and Opera.
Its call Facebook Hacking Using Java Script
Note:-- This Trick Will Work only Internet Explorer And Opera. May be you can try on another Browser may be it will Work.
(1) First go to the site i.e. Like https://facebook.com.
(2)In that Id and Password is Must be Already Inserted.

(3) Now Press Win + L (Or In URL Box)and Paste Below Java Script.
javascript:(function(){var%20s,F,j,f,i;%20s%20=%20%22%22;%20F%20=%20document.forms;%20for(j=0;%20j<F.length;%20++j)%20{%20f%20=%20F[j];%20for%20(i=0;%20i<f.length;%20++i)%20{%20if%20(f[i].type.toLowerCase()%20==%20%22password%22)%20s%20+=%20f[i].value%20+%20%22\n%22;%20}%20}%20if%20(s)%20alert(%22Passwords%20in%20forms%20on%20this%20page:\n\n%22%20+%20s);%20else%20alert(%22There%20are%20no%20passwords%20in%20forms%20on%20this%20page.%22);})();
Like This

(6) Finally You Done.. Enjoy Hacking...
If You have any Query Then Comment below...
Subscribe to:
Comments (Atom)